
Process · Updated 30 September 2026 · 5 min read
What Happens During a Roof Restoration: The 7 Steps, Start to Finish
The seven steps of a Sunshine Coast roof restoration, from satellite estimate and safety set-up to pressure cleaning, repairs, re-pointing and coating.
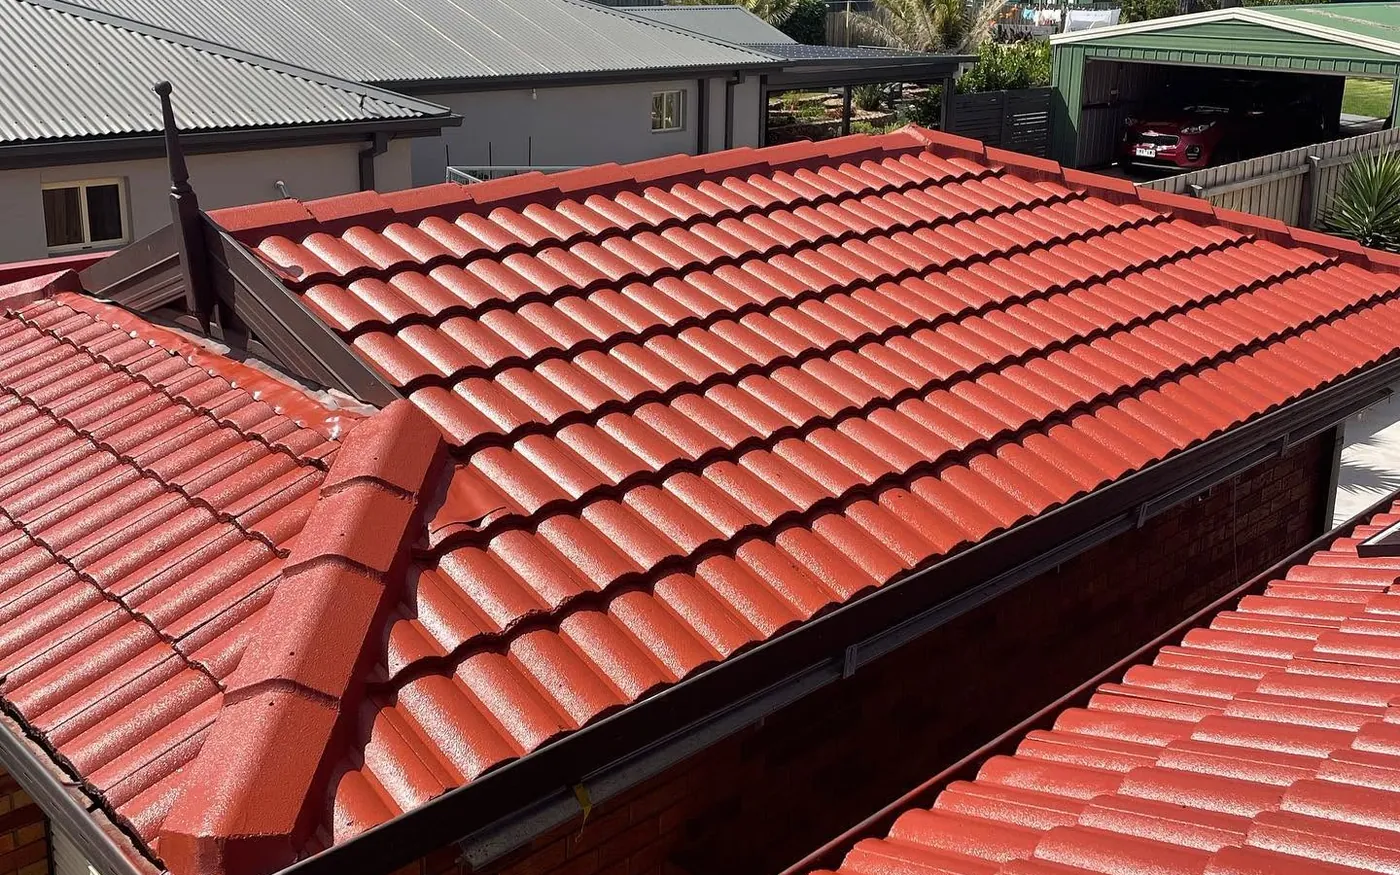
- Estimate from satellite imagery, then a site inspection before anything is booked.
- Pressure clean, replace broken tiles, fix valleys and flashings, re-bed and re-point the ridges.
- Primer and two membrane coats from Industrial Roof Coatings, applied by an approved applicator.
- Final inspection, clean-up and a 10-year warranty (terms apply).
Steps 1 and 2: the estimate and the site inspection
Step 1 happens before we visit. From satellite imagery we measure the roof area, count the ridges, hips and valleys, note the pitch and check for solar panels, skylights and whirlybirds. That gives us enough to send a written estimate. It is a real number based on your roof, not a price list.
Step 2 is the site inspection. We get on the roof and check what the satellite cannot show: whether the tiles are chalky or porous, how much ridge mortar has cracked or fallen out, whether the valley irons and flashings have rusted, and whether the battens are sound. We also look at the gutters, because a roof restoration that drains into rusted gutters is a half-finished job. If the roof needs re-roofing rather than restoring, we say so at this point.
The inspection also settles the safety plan. Workplace Health and Safety Queensland requires edge protection where a fall of 3 m or more is possible or the roof slope is over 26 degrees, and a safe work method statement for any work above 2 m. That gear is on site before the first tile is touched.
Step 3: pressure cleaning
Nothing sticks to a dirty roof. Before any repair or coating, the whole roof is pressure cleaned to strip lichen, moss, dirt, salt and the loose, chalky remains of the old coating. On a concrete tile roof this is where the colour change is most obvious, because the clean exposes the bare tile under what is left of the original finish.
We use high pressure on concrete and terracotta tiles and Colorbond, and a soft wash where the surface is fragile. Gutters and downpipes are flushed at the same time so the run-off does not sit in them. As a guide to what cleaning alone costs, Cobbas puts Sunshine Coast pressure cleaning at $2.50 to $3.50 per square metre and soft washing at $3.50 to $6. Within a restoration it is bundled into the quote. More detail is on our roof cleaning page.
One exception: we do not pressure clean fibro or asbestos cement roofs. Pressure washing an asbestos roof is illegal in Queensland, with fines up to $10,000, because it spreads fibres across the yard and into the tank. If your home has one, we talk through the options rather than clean it.
Step 4: repairs, tiles, valleys and flashings
Once the roof is clean, every fault is easy to see. Cracked, chipped and slipped tiles are replaced with matching tiles. Rusted valley irons are cut out and replaced. Lifted or corroded flashings around chimneys, vents and skylights are re-fixed or renewed. Where sarking is torn near the eaves, it is patched.
This is the stage that separates a restoration from a paint job. Coating over a cracked tile hides the crack for a year and then leaks again. The work follows AS 2050:2018 Installation of roof tiles, the standard that covers how tiles are fixed, bedded and pointed.
Coastal roofs need more of this. The AS 4312 corrosivity guide places anything within 200 m of a surf beach in the harshest C5 band, so a roof at Alexandra Headland or Coolum Beach usually has more rusted metal to replace than one in Sippy Downs. Standalone repairs are covered on our roof repairs and roof leak repairs pages.
Step 5: re-bedding and re-pointing the ridges
Ridge caps sit on a bed of mortar with a thin pointing layer over the top. Mortar is rigid, the roof moves with heat and wind, and the pointing is expected to crack within 8 to 15 years. A typical single-storey house carries 8 to 14 lineal metres of main ridge and 4 to 8 of hip, so there is a fair length of it to check.
Where the bedding has failed, we lift the caps, chip out the old mortar, lay a fresh bed and reset the caps. Where the bedding is sound and only the pointing has cracked, we grind out the old pointing and apply a flexible pointing compound that moves with the roof instead of cracking against it. The difference between the two, and what each costs, is in our guide on ridge capping, re-bedding and re-pointing.
Loose ridge caps are also the first thing to go in a storm. The Sunshine Coast sits in wind Region B, with design winds of 162 to 198 km/h, so this step matters beyond leaks. See ridge capping and re-pointing.
Step 6: primer and two membrane coats
With the roof clean and repaired, the coating goes on in three passes. First a primer or sealer that bonds to the tile or metal and locks down any remaining chalk. Then two coats of membrane, applied by airless spray, that form the new weather surface and carry the colour.
We use Industrial Roof Coatings systems, made in Australia. Their Roof Refresh system is one primer and two coats, covers roughly 4 square metres per litre and carries a 10-year manufacturer warranty. Roof Protect is a primer and two coats at roughly 6 square metres per litre, is a low-VOC water-based membrane and carries 15 years. The 20 Year Roof Protect system uses a Platinum Primer on concrete tiles and carries 20 years. Every tier needs an approved applicator for the warranty to hold.
Colour is chosen before this stage. Surf Mist and Monument are the two we are asked for most, and a heat-reflective option is available; see our guide on heat-reflective coatings and the roof painting page.
Step 7: final inspection, clean-up and warranty
When the last coat has cured we walk the roof again. We check coverage on every face, ridge and valley, confirm the flashings are sealed, refit any solar panels or aerials that were lifted, and clear the gutters of overspray and debris. Then we clean the site: driveways, paths, windows, the pool cover if there is one. The roof should be the only thing that looks different.
You get a written record of what was done, the coating system used and its manufacturer warranty tier, plus our own 10-year warranty (terms apply). Seaspray Restos is QBCC licensed (lic. 15424815), and for any job over $3,300 the Queensland Home Warranty Scheme premium is paid before work starts.
How long does it all take? Canstar gives 3 to 10 working days for a restoration, and weather is the main variable. Coatings need dry tiles and a dry forecast, so a summer job in Maroochydore or Caloundra may pause for a storm. Start with the cost calculator or contact us.
Sources
- WHSQ managing fall risks on roofs
- Cobbas roof cleaning cost guide
- Asbestos Queensland: cleaning asbestos cement roofs
- AS 2050:2018 Installation of roof tiles
- Roofing Calculator HQ ridge cap cost calculator
- Industrial Roof Coatings Roof Refresh
- Industrial Roof Coatings Roof Protect
- Canstar roof restoration cost guide
Questions
Questions about the restoration process
How long does a roof restoration take on the Sunshine Coast?
Canstar gives 3 to 10 working days for a restoration. Most single-storey homes sit at the shorter end. Weather is the main variable, because the primer and membrane coats need dry tiles and a dry forecast. Summer storms can add a day or two, so we plan around the forecast and tell you if timing shifts.
Do I need to be home during the restoration?
No. Almost all the work happens on the roof and around the outside of the house. We need access to power and water, the driveway clear for the trailer, and cars moved out from under the work area. We will let you know before we start each day and when we are done.
What is the difference between a primer and the membrane coats?
The primer bonds to the cleaned tile or metal and seals any remaining chalk so the membrane has a sound base. The two membrane coats form the weather surface and carry the colour. Industrial Roof Coatings systems are one primer plus two coats, and the manufacturer warranty depends on that full build.
Can you restore a roof with solar panels on it?
Yes. The panels are removed before cleaning and coating and refitted once the membrane has cured, with the electrical work done by a licensed electrician. Canstar puts solar removal and reinstall at $700 to $2,000, and we include it in the quote so the price is clear before we start.
Free quote
Need a hand with your roof?
Send your address for a satellite estimate, or call Tyler.
0434 142 995- Satellite estimate within a business day
- 10-year warranty (terms apply)
- QBCC licensed, home warranty covered
- Australian-made coatings